

Recommended Age: All-Ages
Inspired by the mythological figure in Yazan Khalili’s exhibition Medusa, learn how to sculpt your own paper clay masks. Masks are objects that possess multiple meanings; from unknown identities, to face coverings. Create your own artifact that captures hidden histories.
All of the tutorial images were shot on an smartphone, emphasizing the technology used throughout Khalili’s exhibition.
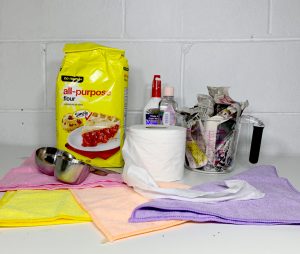
You will need:
- Shredded paper / newspaper / toilet paper – 1 1/2 cups
- Flour or corn flour – 1/2 cup
- Mineral oil – 2 tbsp
- White glue – 3/4 cup
- 1 Bowl
- 1 Container with lid
- Towel / old rag
Optional:
- Gloves
- Wire
- Cardboard
- Paint + decorating materials
- Smartphone
Step 1:
Place hand-ripped newspaper, toilet paper, or any other fine paper sheets into your container. Pour warm water overtop, submerging the paper. Leave the paper to soak for 1 – 2 hours, occasionally stirring the sheets to help the paper dissolve.
Step 2:
While the paper is soaking, try creating a base for your paper mask using a cardboard form. With a pen, trace out the shape you would like to create. Cut out the form using scissors or an exact-o knife. The cardboard form does not have to be perfect, as the paper clay will be covering the shape!
*Optional: experiment with 3D elements using chicken wire to mold a form.
Step 3:
Once the paper is settled, use a hand held blender to mash the paper into a finer pulp. If the mixture is too thick for the hand held blender, you can knead the pulp with your hands.
*Tip: if no blender, settle on using just toilet paper, as the paper sheets are already thinned, allowing for the fibers to break down easily.
Step 4:
Remove the pulp and place into a towel, ringing out the excess water. Make sure to squeeze out as much of the water as you can!
Step 5:
For every 1 1/2 cups of paper pulp, add:
- 1/2 cup of flour
- 1/3 cup of white glue
- 1 tbsp of mineral oil
- If necessary, add water to refine pulp
Using the hand blender, mix the material. If the texture is too thick, use hands and knead in a circular motion. The consistency should feel similar to dough.
Eyeball it! For a thicker texture, add more flour. For a thinner texture, add more water.
Step 6:
Move the paper clay into a storing container. You can store the paper clay for up to 1 month in the refrigerator.
Step 7:
Sprinkle a light dusting of flour if the paper clay is too sticky, this will act as a resistant.
Optional: If you want to add colour to your clay, mix small amounts of paint directly into your paper clay. Roll into a ball, to even out the colours.
Step 8:
Now it’s time to start creating your mask forms! Take a scoop of the paper pulp and start moulding a shape in your hands.
Step 9:
Layer the paper clay, moulding the form until the desired shape is built. Add details by rolling thinner pieces of paper clay, or use utensils to carve the appearance.
Step 10:
Think about the images throughout Khalili’s exhibition, was there a moment that stood out to you? Use this as a source of inspiration while building the shape of the mask.
Step 11:
Once your mask is complete, leave out to dry. Wait until the surface has hardened entirely before painting. You can decorate your mask using paint, pens, collage, etc. There you have it! Your own paper mask.
Bring your mask into the digital, by using your smartphone. Take a photo and edit the form through Instagram, Facetune, TikTok, and other social media platforms. Disguise yourself with a mask while exploring augmented realities.
We hope you enjoy this activity! Share your masks on social media and tag us @mocatoronto.